Technical Blog Of JackCHAN

July 7, 2010

How to change the upload and post maximum size in LAMP Enviroment

Filed under: apache, linux — Tags: , — kaisechen @ 5:06 am

In many situations, PHP developer need to change the upload and post maximum size in LAMP Enviroment.

There are more than one way to extend the limitation.

1) modify php.ini

  • upload_max_filesize = 20M
  • post_max_size = 20M

There are obvious advantages/disadvantages about this way.

a) It is a  system-wide setting            b) It will not be effect until Apache is restarted

2) add and modify .htaccess file

a) Add content into the file

php_value upload_max_filesize 15M
php_value post_max_size 15M

b) change the privilege of the file

chmod 777 .htaccess

There are obvious advantages/disadvantages about this way.

a) It is not a system-wide setting, the .htaccess under DIR only take effection under DIR

b) It will  be effect immediately, don’t need to restart Apache.

July 5, 2010

Configue LDAP authentication

Filed under: database, ldap, linux — Tags: , , — kaisechen @ 5:59 am

Normally, we log in a linux OS, the OS will authenticate the username/password through local account.

Vim /etc/password, all local accounts can be listed.

In some situation, we can use LDAP server as authenticate of outside accounts.

How to configue LDAP server in Suse Linux?

1) Log in Suse Linux as super account who has sudo privilege

2)run linux command

myaccount:~ # yast ldap

YaST(Yet another Setup Tool), is an RPM-based operating system setup and configuration tool that is featured in the openSUSE Linux distribution, as well as Novell’s derived commercial distributions. It features tools that can configure many aspects of the system. It is also part of the defunct United Linux. The first SuSE distribution that included YaST was released in May, 1996.

3) configue

a) the address of LDAP server  b)LDAP Base DN  c)choice version

After finishing, it will be successful for LDAP authication in Suse Linux.

June 21, 2010

Synchronize data between load balance servers

Filed under: linux — Tags: , , — kaisechen @ 7:14 am

It always faces similiar business requirment when developing web application using load balance server, e.g upload image to one server and need to synchronize images to another server.

One solution is building a shell script  and put it into crontab , every five or ten minutes run the script.

In the script , use rsync or scp linux command.

Such as :

myaccount@myserver1.com~>rsync ./ -avz myaccount@myserver2.com:/home/myaccount/html/ -e ssh –safe-links

Of course, it should configue public/private key in myserver1.com.

1) produce public/private key pair

myaccount@myserver1.com~>ssh-keygen -b 2048 -t rsa

Generating public/private rsa key pair.
Enter file in which to save the key (/home/myaccount/.ssh/id_rsa):
Enter passphrase (empty for no passphrase):
Enter same passphrase again:
Your identification has been saved in /home/myaccount/.ssh/id_rsa.
Your public key has been saved in /home/myaccount/.ssh/id_rsa.pub.
The key fingerprint is:
74:78:91:ca:c7:20:14:08:9b:68:cf:15:32:18:7d:21 myaccount@myserver1.com

Notice: don’t input passphrase, because it is the password for private key.

2)copy the public key file to remote server

myaccount@myserver1.com~>scp .ssh/id_rsa.pub myaccount@myserver2.com:/home/myaccount

3)add the content of public key file into authorized_keys in remote server

myaccount@myserver2.com:~> mv id_rsa.pub .ssh/authorized_keys

or

myaccount@myserver2.com:~>cat id_rsa.pub >> .ssh/authorized_keys

4)copy data from local server to remote server now

myaccount@myserver1.com:~>rsync ./ -avz myaccount@myserver2.com:/home/myaccount/html/ -e ssh –safe-links                      building file list … done
./
test.txt

sent 182 bytes  received 48 bytes  460.00 bytes/sec
total size is 60  speedup is 0.26

June 4, 2010

Configue svn plugin in Eclipse/MyEclipse (3)

Filed under: eclipse, java, linux, myeclipse, svn, Technology — Tags: , , , , — kaisechen @ 5:44 am

Next, we need to set the ‘Enviroment variables’  ‘SVN_SSH’ in your desk machine.

1) Right click ‘mycomputer’, choice ‘Properties’, in ‘System Properties’, choice ‘Advanced’, click ‘Enviroment variables’.

2) in ‘System variables’, input ‘SVN_SSH’ value, then click ‘ok’

Now, we can begin to use svn plugin in eclipse/myeclipse

You can check in a new project into svn server or check out a existed project from svn server.

If check in a new project into svn server.

1) Chose the project, right click, and in popuped list, chose ‘Team’, then chose ‘Share Project….”

2) chose ‘SVN’

3)create a new repository location

4)Input the url:svn+ssh://jackchan@mycompany.com/svn/myproject/trunk/

5)Enter fold name

6)click Finish

If check out a existed project from svn server.

click File–>’Import…’ , chose ‘SVN’ , ‘checkout projects from SVN’, create a new repository location or use existing repository location, click ‘next’, select the folder to be checked out from SVN, then click ‘Finish’ button.

Because we have finished the ssh automation connection configure, the process of check out or check in will be finished automatically.

If the configue is fine, we should see svn plugin work normally.

Configue svn plugin in Eclipse/MyEclipse (2)

Filed under: eclipse, java, linux, myeclipse, svn, Technology — Tags: , , , , — kaisechen @ 5:12 am

After installing svn plugin in eclipse/myeclipse, we need to configue how to connect svn server.

The svn repository location is:

svn+ssh://jackchan@mycompany.com/svn/myproject/trunk/

Before connecting svn repository in eclipse/myeclipse, we need to configue Putty client to connect the svn server automatically.

How to configue Putty client to connect the svn server automatically? The important thing is producing a private key file.

1) login the svn server using your name (here  use jackchan),

then input below command in server:

ssh-keygen -b 2048 -t rsa -N happy1HAPPY1 -f jack.ppk
Generating public/private rsa key pair.

2) mv jack.ppk.pub .ssh/authorized_keys , the authorized_keys will be used as public rsa key file in server.

3) scp jack.ppk to your client machine, it will be used as private rsa key file in client.

4)open putty client,select ‘session’, input the hostname and click ‘save’

5)click ‘Data’ in putty,in ‘Auto-login username’ input your name(here is jack)

6)click ‘Auth’ in putty, in ‘Private key file for authentication’, load your private rsa key file

7)return session in putty, saves the session again.

8)in putty installation directory, run ‘pageant’

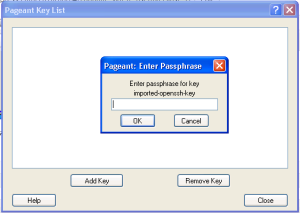
9)right click pageant icon in right-bottom at your desk, and choice ‘add key ‘

10) load your private rsa key file, and input your password, then ‘close’

11) close putty client, reopen it, and you will find you can login automatically the svn server now.


Configue svn plugin in Eclipse/MyEclipse (1)

Filed under: eclipse, java, linux, myeclipse, svn, Technology — Tags: , , , , , — kaisechen @ 2:25 am

How to connect svn Server?

I tried sliksvn, tortoisesvn.

Sliksvn don’t support too much protocal, such as svn+ssh.

Tortoisesvn is good as a svn client.

Both of them support command line. But my favorite IDE is eclipse/myeclipse, so i decide to install a svn client plugin.

There are two kind svn plugins .

(1) Eclipse Subversive – SVN Team Provider Project, Visit http://www.eclipse.org/subversive

(2)Subversion Native Library Adapter (JavaHL), Subclipse is an Eclipse team provider for the Subversion version
control system.  Visit http://subclipse.tigris.org/
This product includes software developed by CollabNet (http://www.Collab.Net/), includes SVNKit(http://svnkit.com/).

I installed both of them,Eclipse Subversive installs and uses easily, so i  just introduce how to install subversion.

Install subversion steps:

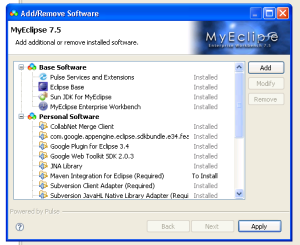
1) In myeclipse, click help–>Software Update –>Add/Remove Software …

2)click “Add”. Then in the opened window, click “Add Site..”.

input ‘http://subclipse.tigris.org/update_1.6.x’

3) click “OK”, click “next”, click “Apply”, the myeclipse will begin to install the plugin, and after finishing the install, it will remind to restart myeclipse.

Create a free website or blog at WordPress.com.