Technical Blog Of JackCHAN

August 4, 2010

Create web service (4) — JAX-RS and JAX-RS Client

Filed under: java, myeclipse, webservice — Tags: , , , — kaisechen @ 1:19 am

It is becoming more and more popular using rest-style web service.

1. create a new web service project, which name is TestWS_RS.

Chose Web Service Framework: REST(JAX-RS)

It automatically produces J2EE structure, and check the web.xml.

<?xml version="1.0" encoding="UTF-8"?>
<web-app version="2.5"
 xmlns="http://java.sun.com/xml/ns/javaee"
 xmlns:xsi="http://www.w3.org/2001/XMLSchema-instance"
 xsi:schemaLocation="http://java.sun.com/xml/ns/javaee
 http://java.sun.com/xml/ns/javaee/web-app_2_5.xsd">
 <servlet>
 <display-name>JAX-RS REST Servlet</display-name>
 <servlet-name>JAX-RS REST Servlet</servlet-name>
 <servlet-class>
 com.sun.jersey.spi.container.servlet.ServletContainer
 </servlet-class>
 <load-on-startup>1</load-on-startup>
 </servlet>
 <servlet-mapping>
 <servlet-name>JAX-RS REST Servlet</servlet-name>
 <url-pattern>/services/*</url-pattern>
 </servlet-mapping>
 <welcome-file-list>
 <welcome-file>index.jsp</welcome-file>
 </welcome-file-list>
</web-app>

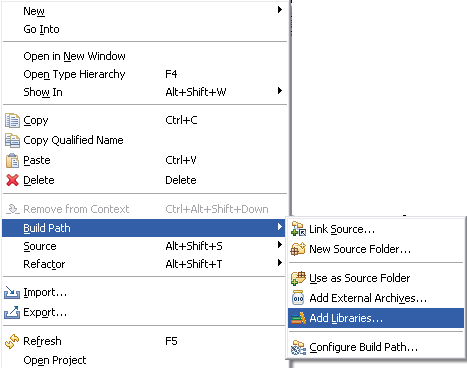
2.Add JAX-RS libraries into the project

chose JAX-RS 1.0.2 Core Libraries(Project Jersey 1.0.2)

JAXB supports the transform between Class and XML.

3. Create a POJO class User and add @XmlRootElement above it

package com.jack.ws;

import javax.xml.bind.annotation.XmlRootElement;

@XmlRootElement
public class User {
private int id;
private String preferedname;
private String firstname;
private String lastname;
private String gender;

public int getId() {
return id;
}

public void setId(int id) {
this.id = id;
}

public String getPreferedname() {
return preferedname;
}

public void setPreferedname(String preferedname) {
this.preferedname = preferedname;
}

public String getFirstname() {
return firstname;
}

public void setFirstname(String firstname) {
this.firstname = firstname;
}

public String getLastname() {
return lastname;
}

public void setLastname(String lastname) {
this.lastname = lastname;
}

public String getGender() {
return gender;
}

public void setGender(String gender) {
this.gender = gender;
}

@Override
public String toString() {
return “Id:”+id+” , FirstName:”+firstname+” , LastName:”+lastname+” , PreferedName:”+preferedname+” , Gender:”+gender;
}

}

4.Build a web service, UserResource

Chose Framework: REST(JAX-RS), Tick ‘Create new Java bean’

In java class field,input ‘UserResource’; chose Produces: application/xml; in URL path field, input ‘users’.

Then click finish button, it produces a ‘UserResource’ Class

5. Now begin to add REST methods in UserResource Class.

Chose UserResource Class,right click ,chose ‘MyEclipse’,chose ‘Add REST Method…’.

Firstly, add ‘getUsers’ method.

Secondly,add ‘getUser’ method.

Thirdly,add ‘addUser’ method.

6. Modify UserResource Class

package com.jack.ws;

import java.util.ArrayList;
import java.util.List;
import java.util.TreeMap;

import javax.ws.rs.Consumes;
import javax.ws.rs.GET;
import javax.ws.rs.POST;
import javax.ws.rs.Path;
import javax.ws.rs.PathParam;
import javax.ws.rs.Produces;

import com.sun.jersey.spi.resource.Singleton;

@Produces("application/xml")
@Path("users")
@Singleton
public class UserResource {
 private TreeMap<Integer, User> userMap = new TreeMap<Integer, User>();

 public UserResource(){
 User user = new User();
 user.setFirstname("Jackie");
 user.setLastname("Chan");
 user.setPreferedname("Jack");
 user.setGender("Male");
 addUser(user);
 }

 @GET
 public List<User> getUsers() {
 List<User> users = new ArrayList<User>();
 users.addAll(userMap.values());
 return users;
 }

 @GET
 @Path("{id}")
 public User getUser(@PathParam("id") int cId) {
 return userMap.get(cId);
 }

 @POST
 @Path("add")
 @Produces("text/plain")
 @Consumes("application/xml")
 public String addUser(User user) {
 int id = userMap.size();
 user.setId(id);
 userMap.put(id, user);
 return "Added a new User and Its info is "+user.toString();
 }
}

7.Deploy the web service into tomcat 6 server.

8.Start Tomcat server

Some information about the web service in tomcat6server console.

04/08/2010 11:57:18 AM org.apache.catalina.startup.HostConfig checkResources
INFO: Reloading context [/TestWS_RS]
04/08/2010 11:57:20 AM com.sun.jersey.api.core.ClasspathResourceConfig init
INFO: Scanning for root resource and provider classes in the paths:
 D:\tomcat\webapps\TestWS_RS\WEB-INF\lib
 D:\tomcat\webapps\TestWS_RS\WEB-INF\classes
04/08/2010 11:57:21 AM com.sun.jersey.api.core.ClasspathResourceConfig init
INFO: Root resource classes found:
 class com.jack.ws.CustomersResource
 class com.jack.ws.UserResource
04/08/2010 11:57:21 AM com.sun.jersey.api.core.ClasspathResourceConfig init
INFO: Provider classes found:

9.Now begin to test the web service

chose this project, right click, chose ‘MyEclipse’,then chose ‘Test with web service explore’.


10.click id,input 0 in id field, then click Test button.

It gets a Response

<?xml version="1.0" encoding="UTF-8"?>
 <user>
 <firstname>Jackie</firstname>
 <gender>Male</gender>
 <id>0</id>
 <lastname>Chan</lastname>
 <preferedname>Jack</preferedname>
 </user>

11. Click add,in the content field, input

<user>
 <firstname>Jeanny</firstname>
 <lastname>Shery</lastname>
 <preferedname>Jean</preferedname>
 <gender>Female</gender>
</user>

click test button, get a response

Added a new User and Its info is Id:1 , FirstName:Jeanny , LastName:Shery , PreferedName:Jean , Gender:Female

12. Click User,Click Test Button, it gets a response.

<?xml version="1.0" encoding="UTF-8"?>     
 <users> 
 <user> 
 <firstname>Jackie</firstname> 
 <gender>Male</gender> 
 <id>0</id> 
 <lastname>Chan</lastname> 
 <preferedname>Jack</preferedname> 
 </user> 
 <user> 
 <firstname>Jeanny</firstname> 
 <gender>Female</gender> 
 <id>1</id> 
 <lastname>Shery</lastname> 
 <preferedname>Jean</preferedname> 
 </user> 
 </users>

13. Now begin to use other browser to test the web server, open firefox, input

http://localhost:8080/TestWS_RS/services/users/0

It will invoke getUser method in UserResource Class, and return xml of a user object

http://localhost:8080/TestWS_RS/services/users/1

It will invoke getUser method in UserResource Class, and return xml of another user object

14. Install poster plugin in firefox, use poster to test addUser method of the web service

Open poster

In URL field, input ‘http://localhost:8080/TestWS_RS/services/users/add&#8217;

In Content Type field, input ‘application/xml’

In Content field,input:

<user>
 <firstname>Hilly</firstname>
 <lastname>Paris</lastname>
 <preferedname>Hill</preferedname>
 <gender>Male</gender>
</user>

Click post button, it will get a response quickly.

Added a new User and Its info is Id:2 , FirstName:Hilly , LastName:Paris , PreferedName:Hill , Gender:Male

15. Open firefox, input the url

http://localhost:8080/TestWS_RS/services/users

It will invoke getUsers method in UserResource Class and return a user list.

<users>
−
<user>
<firstname>Jackie</firstname>
<gender>Male</gender>
<id>0</id>
<lastname>Chan</lastname>
<preferedname>Jack</preferedname>
</user>
−
<user>
<firstname>Jeanny</firstname>
<gender>Female</gender>
<id>1</id>
<lastname>Shery</lastname>
<preferedname>Jean</preferedname>
</user>
−
<user>
<firstname>Hilly</firstname>
<gender>Male</gender>
<id>2</id>
<lastname>Paris</lastname>
<preferedname>Hill</preferedname>
</user>
</users>

July 28, 2010

Create web service (3) — JAX-WS and JAX-WS Client

Filed under: java, myeclipse, webservice — Tags: , , — kaisechen @ 12:18 pm

In MyEclipse , it is very easy to build web service base on some web service framework.

Let’s build a JAX-WS web service.

1.Create a web service project in MyEclipse, which name is TestWS_JAXWS.

chose JAX-WS framework

It automatically produces J2EE directory.

2. import JAX-WS 2.1 library into the project

chose MyEclipse Libraries

Select JAX-WS 2.1 Libraries

3. Build a simple java which includes several methods

public class Calculator {
 public int add(int a, int b) {
 return (a + b);
 }

 public int subtract(int a, int b) {
 return (a - b);
 }

 public int multiply(int a, int b) {
 return (a * b);
 }

 public int divide(int a, int b) {
 return (a / b);
 }
}

4. Build a new web service

chose JAX-WS Framework and ‘Create web service from Java class’

In Java Class field, input ‘com.jack.ws.Calculator’ which is created at above step

It automatically fill in other fields,

Modify target namespace field to ‘http://localhost:8080/TestWS_JAXWS&#8217;

tick ‘Generate WSDL in project’

5. After click Finish button, it produces a lot of  files, directory and class

CalculatorDelegate class

wsdl directory, web.xml under WEB-INF

CalculatorDelegate.java

@javax.jws.WebService(targetNamespace = "http://localhost:8080/TestWS_JAXWS", serviceName = "CalculatorService", portName = "CalculatorPort", wsdlLocation = "WEB-INF/wsdl/CalculatorService.wsdl")
public class CalculatorDelegate {

 com.jack.ws.Calculator calculator = new com.jack.ws.Calculator();

 public int add(int a, int b) {
 return calculator.add(a, b);
 }

 public int subtract(int a, int b) {
 return calculator.subtract(a, b);
 }

 public int multiply(int a, int b) {
 return calculator.multiply(a, b);
 }

 public int divide(int a, int b) {
 return calculator.divide(a, b);
 }

}

web.xml

<?xml version="1.0" encoding="UTF-8"?>
<web-app version="2.5"
 xmlns="http://java.sun.com/xml/ns/javaee"
 xmlns:xsi="http://www.w3.org/2001/XMLSchema-instance"
 xsi:schemaLocation="http://java.sun.com/xml/ns/javaee
 http://java.sun.com/xml/ns/javaee/web-app_2_5.xsd">
 <servlet>
 <description>JAX-WS endpoint - CalculatorService</description>
 <display-name>CalculatorService</display-name>
 <servlet-name>CalculatorService</servlet-name>
 <servlet-class>
 com.sun.xml.ws.transport.http.servlet.WSServlet
 </servlet-class>
 <load-on-startup>1</load-on-startup>
 </servlet>
 <servlet-mapping>
 <servlet-name>CalculatorService</servlet-name>
 <url-pattern>/CalculatorPort</url-pattern>
 </servlet-mapping>
 <welcome-file-list>
 <welcome-file>index.jsp</welcome-file>
 </welcome-file-list>
 <listener>
 <listener-class>
 com.sun.xml.ws.transport.http.servlet.WSServletContextListener
 </listener-class>
 </listener></web-app>

sun-jaxws.xml

<?xml version = "1.0"?>
<endpoints version="2.0"
 xmlns="http://java.sun.com/xml/ns/jax-ws/ri/runtime">
 <endpoint name="CalculatorPort"
 implementation="com.jack.ws.CalculatorDelegate"
 url-pattern="/CalculatorPort">
 </endpoint></endpoints>

CalculatorService.wsdl

<?xml version="1.0" encoding="UTF-8"?>
<!-- Generated by JAX-WS RI at http://jax-ws.dev.java.net. RI's version is JAX-WS RI 2.1.3-hudson-390-. -->
<definitions xmlns="http://schemas.xmlsoap.org/wsdl/" xmlns:soap="http://schemas.xmlsoap.org/wsdl/soap/" xmlns:tns="http://localhost:8080/TestWS_JAXWS" xmlns:wsu="http://docs.oasis-open.org/wss/2004/01/oasis-200401-wss-wssecurity-utility-1.0.xsd" xmlns:xsd="http://www.w3.org/2001/XMLSchema" name="CalculatorService" targetNamespace="http://localhost:8080/TestWS_JAXWS">
 <types>
 <xsd:schema>
 <xsd:import namespace="http://localhost:8080/TestWS_JAXWS" schemaLocation="CalculatorService_schema1.xsd"/>
 </xsd:schema>
 </types>
 <message name="add">
 <part element="tns:add" name="parameters"/>
 </message>
 <message name="addResponse">
 <part element="tns:addResponse" name="parameters"/>
 </message>
 <message name="divide">
 <part element="tns:divide" name="parameters"/>
 </message>
 <message name="divideResponse">
 <part element="tns:divideResponse" name="parameters"/>
 </message>
 <message name="multiply">
 <part element="tns:multiply" name="parameters"/>
 </message>
 <message name="multiplyResponse">
 <part element="tns:multiplyResponse" name="parameters"/>
 </message>
 <message name="subtract">
 <part element="tns:subtract" name="parameters"/>
 </message>
 <message name="subtractResponse">
 <part element="tns:subtractResponse" name="parameters"/>
 </message>
 <portType name="CalculatorDelegate">
 <operation name="add">
 <input message="tns:add"/>
 <output message="tns:addResponse"/>
 </operation>
 <operation name="divide">
 <input message="tns:divide"/>
 <output message="tns:divideResponse"/>
 </operation>
 <operation name="multiply">
 <input message="tns:multiply"/>
 <output message="tns:multiplyResponse"/>
 </operation>
 <operation name="subtract">
 <input message="tns:subtract"/>
 <output message="tns:subtractResponse"/>
 </operation>
 </portType>
 <binding name="CalculatorPortBinding" type="tns:CalculatorDelegate">
 <soap:binding style="document" transport="http://schemas.xmlsoap.org/soap/http"/>
 <operation name="add">
 <soap:operation soapAction=""/>
 <input>
 <soap:body use="literal"/>
 </input>
 <output>
 <soap:body use="literal"/>
 </output>
 </operation>
 <operation name="divide">
 <soap:operation soapAction=""/>
 <input>
 <soap:body use="literal"/>
 </input>
 <output>
 <soap:body use="literal"/>
 </output>
 </operation>
 <operation name="multiply">
 <soap:operation soapAction=""/>
 <input>
 <soap:body use="literal"/>
 </input>
 <output>
 <soap:body use="literal"/>
 </output>
 </operation>
 <operation name="subtract">
 <soap:operation soapAction=""/>
 <input>
 <soap:body use="literal"/>
 </input>
 <output>
 <soap:body use="literal"/>
 </output>
 </operation>
 </binding>
 <service name="CalculatorService">
 <port binding="tns:CalculatorPortBinding" name="CalculatorPort">
 <soap:address location="http://localhost:8080/TestWS_JAXWS/CalculatorPort"/>
 </port>
 </service>
</definitions>

6.Launch SOAP Web Service Explore to make a test to the web sercie

There are two Explores to be chosen. Select one.

Then click ‘WSDL Page’ in right-top , then click ‘WSDL Main’ in left-top

Input “http://localhost:8080/TestWS_JAXWS/CalculatorPort?WSDL&#8221;

Notice:

1) CalculatorPort  match the servlet-mapping in web.xml

2)?WSDL

This is a universal query string argument that can be added to the end of any web service which will tell the web service to return it’s full WSDL to the caller. In this case, the WSDL is returned to our Web Services Explorer tool which loads it up, and displays the web services exposed operations to us.

click ‘add’, ‘divide’,’subtract’,’multiply’ etc methods

e.g. add, input 100, 555, add go, then will get a return value:655

e.g. subtract, input 1000, 20 , will get 980

7. Build a new Java project as the client to use the web service, which name is TestWS_JAXWSClient

8. Build a new web service client in the project

Chose JAX-WS framework

In WSDL URL input ‘http://localhost:8080/TestWS_JAXWS/CalculatorPort?wsdl&#8217;

Create a java package

It has  a WSDL validation, click finish button

9. It automatically produces a lot of classes under new created java package

It is very easy to understand the meaning of those classes from literal

10. Build a Test Class in the java client project

public class Test {
public static void main(String[] args) {
CalculatorService  cs = new CalculatorService();
CalculatorDelegate cd = cs.getCalculatorPort();
System.out.println("3 + 10    = "+cd.add(3,10));
System.out.println("999 - 222 = "+cd.subtract(999,222));
System.out.println("250 / 5   = "+cd.divide(250, 5));
System.out.println("7 * 23    = "+cd.multiply(7,23));
}
}

11. Run Test.java, it will get

3 + 10    = 13
999 - 222 = 777
250 / 5   = 50
7 * 23    = 161

package com.jack.ws;

import java.net.MalformedURLException;
import java.net.URL;
import java.util.logging.Logger;
import javax.xml.namespace.QName;
import javax.xml.ws.Service;
import javax.xml.ws.WebEndpoint;
import javax.xml.ws.WebServiceClient;

/**
* This class was generated by the JAX-WS RI. JAX-WS RI 2.1.3-hudson-390-
* Generated source version: 2.0
* <p>
* An example of how this class may be used:
*
* <pre>
* CalculatorService service = new CalculatorService();
* CalculatorDelegate portType = service.getCalculatorPort();
* portType.add(…);
* </pre>
*
* </p>
*
*/
@WebServiceClient(name = “CalculatorService”, targetNamespace = “http://localhost:8080/TestWS_JAXWS&#8221;, wsdlLocation = “http://localhost:8080/TestWS_JAXWS/CalculatorPort?wsdl&#8221;)
public class CalculatorService extends Service {

private final static URL CALCULATORSERVICE_WSDL_LOCATION;
private final static Logger logger = Logger
.getLogger(com.jack.ws.CalculatorService.class.getName());

static {
URL url = null;
try {
URL baseUrl;
baseUrl = com.jack.ws.CalculatorService.class.getResource(“.”);
url = new URL(baseUrl,
http://localhost:8080/TestWS_JAXWS/CalculatorPort?wsdl&#8221;);
} catch (MalformedURLException e) {
logger
.warning(“Failed to create URL for the wsdl Location: ‘http://localhost:8080/TestWS_JAXWS/CalculatorPort?wsdl&#8217;, retrying as a local file”);
logger.warning(e.getMessage());
}
CALCULATORSERVICE_WSDL_LOCATION = url;
}

public CalculatorService(URL wsdlLocation, QName serviceName) {
super(wsdlLocation, serviceName);
}

public CalculatorService() {
super(CALCULATORSERVICE_WSDL_LOCATION, new QName(
http://localhost:8080/TestWS_JAXWS&#8221;, “CalculatorService”));
}

/**
*
* @return returns CalculatorDelegate
*/
@WebEndpoint(name = “CalculatorPort”)
public CalculatorDelegate getCalculatorPort() {
return super.getPort(new QName(“http://localhost:8080/TestWS_JAXWS&#8221;,
“CalculatorPort”), CalculatorDelegate.class);
}

}

July 27, 2010

Create web service (2) — XFire Client

Filed under: java, myeclipse, webservice — Tags: , , , , — kaisechen @ 1:46 pm

We build a  java client to invoke the XFire web service

1.Create a java project in MyEclipse,  which name is TestWS_XFireClient

2.Add XFire client library

chose ‘MyEclipse Libraries’

chose ‘XFire 1.2 HTTP Client Libraries’

click finish, it will import two libraries into the project

3.import the TestWS_XFire project as the dependency project of ‘TestWS_XFireClient’

4. Build a WeatherClient class

import java.net.MalformedURLException;

import org.codehaus.xfire.XFireFactory;
import org.codehaus.xfire.client.XFireProxyFactory;
import org.codehaus.xfire.service.Service;
import org.codehaus.xfire.service.binding.ObjectServiceFactory;

public class WeatherClient {

 /**
 * @param args
 */
 public static void main(String[] args) {
 Service srvcModel = new ObjectServiceFactory().create(Iweather.class);
 XFireProxyFactory factory = new XFireProxyFactory(XFireFactory
 .newInstance().getXFire());
 String weatherURL = "http://localhost:8080/TestWS_XFire/services/weather";
 try {
 Iweather srvc = (Iweather) factory.create(srvcModel, weatherURL);
 String result = srvc.example("Jack");
 System.out.print(result);
 } catch (MalformedURLException e) {
 e.printStackTrace();
 }
 }

}

5. run WeatherClient and it will get the result listed below:

Hello JACK ,Welcome the world of Web Service

July 26, 2010

Create EJB Enitiy Bean Example In MyEclipse (2)

Filed under: ejb, java, jboss, myeclipse, Technology — Tags: , , , — kaisechen @ 2:35 am

Now, we will create a JAVA project as the remote client invoking stateless session bean in EntityEJBUserManager project.

1. Create a Java project which name is ‘EntityEJBUserManagerClient’

2.import ‘EntityEJBUserManager.jar’ which exported through ‘EntityEJBUserManager’ project

3.import Jboss5 User Library which includes all jar in D:/jboss5/client/

4.import Hibernate3 User Library which includes the necessary jar of Hibernate 3.3.1

5. Create a client class

import java.util.List;
import java.util.Properties;

import javax.naming.InitialContext;
import javax.naming.NamingException;

import com.jack.ejb.domain.User;
import com.jack.ejb.inter.UserDAO;

public class UserDAOClient {

 /**
 * @param args
 */
 public static void main(String[] args) {
 Properties env = new Properties();
 env.put("java.naming.factory.initial",
 "org.jnp.interfaces.NamingContextFactory");
 env.put("java.naming.factory.url.pkgs",
 "org.jboss.naming:org.jnp.interfaces");
 env.put("java.naming.provider.url", "localhost");

 InitialContext ctx;
 UserDAO userdao;
 try {
 ctx = new InitialContext(env);
 userdao = (UserDAO) ctx.lookup("UserDAOBean/remote");

 System.out.println(".................................");
 System.out.println("Insert a user....................");
 boolean re = userdao.insert("Hello World", "Male");
 System.out.println("The result of insert a user is "+re);
 re = userdao.insert("EntityBean", "FeMale");
 System.out.println("The result of insert a user is "+re);

 System.out.println(".................................");
 System.out.println("Get a user.......................");

 User user = userdao.get(1);
 System.out.println("ID:1 and Name:"+user.getName()+" Sex:"+user.getSex());

 System.out.println(".................................");
 System.out.println("Update a user ...................");

 User user1 = userdao.get(1);
 user1.setName("UpdateEJB");
 userdao.update(user1);

 System.out.println("ID:"+user1.getId()+" and Name:"+user1.getName()+" Sex:"+user1.getSex());

 System.out.println(".................................");
 System.out.println("Get a user list..................");

 List<User> userlist = userdao.getUserList();
 for(User u:userlist){
 System.out.println("ID:"+u.getId()+" and Name:"+u.getName()+" Sex:"+u.getSex());
 }

 } catch (NamingException e) {
 e.printStackTrace();
 }
 }

}

6.run the java project and will get the result listed below

7. Check the MySQL database, and will have the result listed below

8. Check the admin console of jboss5, we can get more information

URL:http://localhost:8082/jmx-console/

Create EJB Enitiy Bean Example In MyEclipse (1)

Filed under: ejb, java, myeclipse, Technology — Tags: , , — kaisechen @ 1:59 am

EJB3 becomes more continent than EJB2. It saves a lot of time to build a EJB project using MyEclipse.

1. Create a new EJB project in MyEclipse, which name is ‘EntityEJBUserManager

Chose EJB3.0 , tick ‘Add support for Entity beans(add JPA capabilities)’

2.MyEclipse will automatically produce a “persistence.xml” file

2.1 configue jta data source,’java:/DefaultMySQLDS’

2.2 add property

<properties>
 <property name="hibernate.hbm2ddl.auto" value="create"/>
 </properties>

3. import MySQL  driver

4. copy D:\jboss5\docs\examples\jca\mysql-ds.xml and modify it, then copy the file into D:\jboss5\server\default\deploy

<?xml version="1.0" encoding="UTF-8"?>

<!-- $Id: mysql-ds.xml 41017 2006-02-07 14:26:14Z acoliver $ -->
<!--  Datasource config for MySQL using 3.0.9 available from:
http://www.mysql.com/downloads/api-jdbc-stable.html
-->

<datasources>
 <local-tx-datasource>
 <jndi-name>DefaultMySQLDS</jndi-name>
 <connection-url>jdbc:mysql://localhost:3308/ejb</connection-url>
 <driver-class>com.mysql.jdbc.Driver</driver-class>
 <user-name>ejb</user-name>
 <password>ejb</password>
 <exception-sorter-class-name>org.jboss.resource.adapter.jdbc.vendor.MySQLExceptionSorter</exception-sorter-class-name>
 <!-- should only be used on drivers after 3.22.1 with "ping" support
 <valid-connection-checker-class-name>org.jboss.resource.adapter.jdbc.vendor.MySQLValidConnectionChecker</valid-connection-checker-class-name>
 -->
 <!-- sql to call when connection is created
 <new-connection-sql>some arbitrary sql</new-connection-sql>
 -->
 <!-- sql to call on an existing pooled connection when it is obtained from pool - MySQLValidConnectionChecker is preferred for newer drivers
 <check-valid-connection-sql>some arbitrary sql</check-valid-connection-sql>
 -->

 <!-- corresponding type-mapping in the standardjbosscmp-jdbc.xml (optional) -->
 <metadata>
 <type-mapping>mySQL</type-mapping>
 </metadata>
 </local-tx-datasource>
</datasources>

Please notice: the name of jndi-name is ‘DefaultMySQLDS’, match the jta-data-source in persistence.xml

5. Create a Entity Bean ‘User’

please notice annotation ‘Entity’ and ‘Table’ above class  and ‘ID’ above id property.

import java.io.Serializable;

import javax.persistence.Entity;
import javax.persistence.GeneratedValue;
import javax.persistence.GenerationType;
import javax.persistence.Id;
import javax.persistence.Table;

@Entity
@Table(name="User")
public class User implements Serializable {
 /**
 *
 */
 private static final long serialVersionUID = 6136720247591443052L;
 private int id;
 private String name;
 private String sex;

 @Id
 @GeneratedValue(strategy=GenerationType.AUTO)
 public int getId() {
 return id;
 }

 public void setId(int id) {
 this.id = id;
 }

 public String getName() {
 return name;
 }

 public void setName(String name) {
 this.name = name;
 }

 public String getSex() {
 return sex;
 }

 public void setSex(String sex) {
 this.sex = sex;
 }

}

6. Create a interface ‘UserDAO’

import java.util.List;

import com.jack.ejb.domain.User;

public interface UserDAO {
 public boolean insert(String name,String sex);
 public User get(int id);
 public List<User> getUserList();
 public boolean update(User user);
}

7. Create a stateless session bean ‘UserDAOBean’ implements UserDAO

please notice it uses ‘Remote’ annotation

import java.util.List;

import javax.ejb.Remote;
import javax.ejb.Stateless;
import javax.persistence.EntityManager;
import javax.persistence.PersistenceContext;
import javax.persistence.Query;

import com.jack.ejb.domain.User;
import com.jack.ejb.inter.UserDAO;

@Stateless
@Remote(UserDAO.class)
public class UserDAOBean implements UserDAO {
 @PersistenceContext
 protected EntityManager em; 

 public User get(int id) {
 User user = em.find(User.class, Integer.valueOf(id));
 return user;
 }

 @SuppressWarnings("unchecked")
 public List<User> getUserList() {
 Query query = em.createQuery("from User order by name");
 return (List<User>)query.getResultList();
 }

 public boolean insert(String name, String sex) {
 User user = new User();
 user.setName(name);
 user.setSex(sex);
 em.persist(user);
 return true;
 }

 public boolean update(User user) {
 em.merge(user);
 return true;
 }

}

8. Export ‘User’ class and ‘UserDAO’ interface into ‘EntityEJBUserManager.jar’, so java client project can import it later.

9. run jboss 5 server

10. Deploy the EJB project into Jboss 5 server

July 25, 2010

The methods invoking EJB from Clients (4) — Remote Web Client

Filed under: ejb, java, myeclipse, Technology — Tags: , , — kaisechen @ 4:17 am

The third method invoking EJB from client is ‘Remote Web Client’.

1.Create a Web Project in MyEclipse, which name is SessionEJBUserManagerWebRemoteClient

2. Modify index.jsp

<%@ page language="java" import="javax.naming.*;,com.jack.inter.*;" pageEncoding="UTF-8"%>

<!DOCTYPE HTML PUBLIC "-//W3C//DTD HTML 4.01 Transitional//EN">
<html>
 <head>
 <title>My JSP 'index.jsp' starting page</title>
 <meta http-equiv="pragma" content="no-cache">
 <meta http-equiv="cache-control" content="no-cache">
 <meta http-equiv="expires" content="0">
 <meta http-equiv="keywords" content="keyword1,keyword2,keyword3">
 <meta http-equiv="description" content="This is my page">
 </head>

 <body>
 <%
 UserManager userMan;

 try {
 Properties env = new Properties();

 env.put("java.naming.factory.initial",
 "org.jnp.interfaces.NamingContextFactory");

 env.put("java.naming.factory.url.pkgs",
 "org.jboss.naming:org.jnp.interfaces");

 env.put("java.naming.provider.url", "localhost");

 InitialContext ctx = new InitialContext(env);

 userMan = (UserManager) ctx.lookup("UserManagerBean/remote");

 User user = userMan.addUser("Hello", "World");
 out.println("User ID:" + user.getId() + " and Username:"
 + user.getUsername() + " and Password:"
 + user.getPassword() + "<br>");

 User user2 = new User();
 User user3 = userMan.updateUser(user2, "Update username",
 "Update password");
 out.println("User ID:" + user3.getId() + " and Username:"
 + user3.getUsername() + " and Password:"
 + user3.getPassword());
 } catch (NamingException e) {
 e.printStackTrace();
 }

 } catch (java.lang.Exception e
 %>
 </body>
</html>

3.Modify EJB UserManagerBean in SessionEJBUserManager Project

Adjust local annotation to remote

import javax.ejb.Remote;
import javax.ejb.Stateless;

import com.jack.inter.User;
import com.jack.inter.UserManager;

@Stateless
@Remote
//@Local
public class UserManagerBean implements UserManager {

 public User addUser(String name, String password) {
 User user = new User();
 user.setUsername(name);
 user.setPassword(password);
 user.setId(100);
 return user;
 }
.
.
.

4.Re-deploy SessionEJBUserManager Project into Jboss5 server

5.In SessionEJBUserManagerWebRemoteClient Project,import SessionEJB.jar

SessionEJB.jar includes the User POJO class and UserManager interface of SessionEJBUserManager Project

6.In SessionEJBUserManagerWebRemoteClient Project,import “jboss5-without-servlet” user library

6.1 Go to Jboss client directory, copy jboss-javaee into jboss-javaee-without-servlet

6.2Open jboss-javaee-without-servlet.jar using winrar, delete servlet directory.

The purpose of removing servlet directory is because tomcat container has own servlet.

6.3. The size of jboss-javaee-without-servlet is smaller than that of jboss-javaee

6.4.In MyEclipse, create a new User Library —“jboss5-without-servlet”, add all jars except jboss-javaee under jboss5 client directory   into it.

6.5. Add jboss5-without-servlet User Library to the remote web client project

6. Deploy SessionEJBUserManagerWebClient project into Tomcat 6 server


7.Run tomcat 6 server


8. Run the remote web client

The methods invoking EJB from Clients (3) — Local Web Client

Filed under: ejb, java, myeclipse, Technology — Tags: , , — kaisechen @ 3:17 am

The second method invoking EJB from client is ‘Local Web Client’.

1.Create a Web Project in MyEclipse,which name is SessionEJBUserManagerWebClient

2. Modify index.jsp

<%@ page language="java" import="javax.naming.*,com.jack.inter.*" pageEncoding="UTF-8"%>

<!DOCTYPE HTML PUBLIC "-//W3C//DTD HTML 4.01 Transitional//EN">
<html>
 <head>
 <title>My JSP 'index.jsp' starting page</title>
 <meta http-equiv="pragma" content="no-cache">
 <meta http-equiv="cache-control" content="no-cache">
 <meta http-equiv="expires" content="0">
 <meta http-equiv="keywords" content="keyword1,keyword2,keyword3">
 <meta http-equiv="description" content="This is my page">
 </head>

 <body>
<%
 InitialContext ctx = new InitialContext();
 UserManager userMan;

 try {
 userMan = (UserManager) ctx.lookup("UserManagerBean/local");

 User user = userMan.addUser("Hello", "World");
 out.println("User ID:" + user.getId() + " and Username:"
 + user.getUsername() + " and Password:"
 + user.getPassword()+"<br>");

 User user2 = new User();
 User user3 = userMan.updateUser(user2, "Update username",
 "Update password");
 out.println("User ID:" + user3.getId()
 + " and Username:" + user3.getUsername()
 + " and Password:" + user3.getPassword());
 } catch (NamingException e) {
 e.printStackTrace();
 }
 %>        
 </body>
</html>

3.Modify EJB UserManagerBean in SessionEJBUserManager Project

Adjust remote annotation to local

import javax.ejb.Local;
import javax.ejb.Stateless;

import com.jack.inter.User;
import com.jack.inter.UserManager;

@Stateless
//@Remote
@Local
public class UserManagerBean implements UserManager {

 public User addUser(String name, String password) {
 User user = new User();
 user.setUsername(name);
 user.setPassword(password);
 user.setId(100);
 return user;
 }
.
.
.

4.Re-deploy SessionEJBUserManager Project into Jboss5 server

5.In SessionEJBUserManagerWebClient Project, add SessionEJBUserManager Project as dependency project

6. Deploy SessionEJBUserManagerWebClient project into JBoss 5 server

7.Run the web client


The methods invoking EJB from Clients (2) — Java Application Remote Client

Filed under: ejb, java, myeclipse, Technology — Tags: , , — kaisechen @ 2:40 am

The first method invoking EJB from client is ‘JAVA Application Remote Client’.

1.Create a JAVA Application project as  the remote client to invoke the EJB of SessionEJBUserManager, which name is SessionEJBUserManagerClient

2.Export User POJO class and UserManager interface into a jar in SessionEJBUserManager project

3.import exported SessionEJB.jar into SessionEJBUserManagerClient project

4. Add the JEE library into the Client Project

5.Create SessionUserManagerRemoteClient Class in Client project

import java.util.Properties;

import javax.naming.InitialContext;
import javax.naming.NamingException;

import com.jack.inter.User;
import com.jack.inter.UserManager;

public class SessionUserManagerRemoteClient {

 /**
 * @param args
 */
 public static void main(String[] args) {
 Properties env = new Properties();
 env.put("java.naming.factory.initial",
 "org.jnp.interfaces.NamingContextFactory");
 env.put("java.naming.factory.url.pkgs",
 "org.jboss.naming:org.jnp.interfaces");
 env.put("java.naming.provider.url", "localhost");

 InitialContext ctx;
 UserManager userMan;
 try {
 ctx = new InitialContext(env);
 userMan = (UserManager) ctx.lookup("UserManagerBean/remote");

 User user = userMan.addUser("Hello", "World");
 System.out.println("User ID:" + user.getId() + " and Username:"
 + user.getUsername() + " and Password:"
 + user.getPassword());

 User user2 = new User();
 User user3 = userMan.updateUser(user2, "Update username",
 "Update password");
 System.out.println("User ID:" + user3.getId() + " and Username:"
 + user3.getUsername() + " and Password:"
 + user3.getPassword());
 } catch (NamingException e) {
 e.printStackTrace();
 }

 }

}

6.run client

7. The result

The methods invoking EJB from Clients (1)–Create A EJB Project

Filed under: ejb, java, myeclipse, Technology — Tags: , , — kaisechen @ 1:59 am

There are several methos invoking EJB from clients, including java remote client, web local client etc.

Let us build a session EJB project first.

1. Build a new EJB project in MyEclipse, which name is SessionEJBUserManager

2.create a Serializable POJO class User

import java.io.Serializable;

public class User implements Serializable {
 /**
 *
 */
 private static final long serialVersionUID = -9011491680424647685L;
 private int id;
 private String username;
 private String password;

 public int getId() {
 return id;
 }

 public void setId(int id) {
 this.id = id;
 }

 public String getUsername() {
 return username;
 }

 public void setUsername(String username) {
 this.username = username;
 }

 public String getPassword() {
 return password;
 }

 public void setPassword(String password) {
 this.password = password;
 }

}

3.create UserManager interface

public interface UserManager {
 public User addUser(String name,String password);
 public User updateUser(User user,String name,String password);
}

4.create a Stateless Session Bean implements UserManager

import com.jack.inter.User;
import com.jack.inter.UserManager;

@Stateless
@Remote
//@Local
public class UserManagerBean implements UserManager {

 public User addUser(String name, String password) {
 User user = new User();
 user.setUsername(name);
 user.setPassword(password);
 user.setId(100);
 return user;
 }

 public User updateUser(User user, String name, String password) {
 user.setUsername(name);
 user.setPassword(password);
 user.setId(999);
 return user;
 }
}

5.Deploy the EJB project into JBOSS5 server

6.run Jboss5

July 21, 2010

Build EJB application Using MyEclipse/Jboss (2)

Filed under: ejb, java, Technology — Tags: , , — kaisechen @ 1:53 pm

6. Export interface into a jar

7.Build a new Java Project as EJB client

8.Add “interface jar” into built path in EJB client project

9. Add jboss5 User Library in EJB client project

The jboss5 includes all libraries under the client directory of Jboss5

10.Write a client class in EJB client project

import javax.naming.InitialContext;
import javax.naming.NamingException;

public class GreetingEJBClient {

 public static void main(String[] args){
 try{
 InitialContext ctx = new InitialContext();
 GreetingEJBInterface greet =
 (GreetingEJBInterface) ctx.lookup("GreetingEJBBean/remote");
 String s = greet.greeting2People("World");
 System.out.println(s);
 }catch (NamingException ne){
 ne.printStackTrace();
 }
 }
}

11. Configue the JNDI properties in EJB client project

The content decides how to find the EJB container.

Put the jndi.properties file under src directory.

12. Run Jboss5 Server

13.Deploy the EJB project into Jboss5 server

14.Run EJB client class


15. Outcome

Older Posts »

Create a free website or blog at WordPress.com.